Tuesday, December 22, 2009
Tuesday, December 15, 2009
Thursday, December 10, 2009
Wednesday, December 2, 2009

Saturday, November 7, 2009
Building NAS? Skip the Performance Drives
This article talks about how the RAID controller speed is more important than drive speed.
http://gizmodo.com/5399370/building-a-nas-skip-the-performance-drives
http://gizmodo.com/5399370/building-a-nas-skip-the-performance-drives
Friday, November 6, 2009
Wire Your House with Ethernet
Hi The Home Networker! I haven't seen you in a while. Let's update you with something useful.
This article is a great one on how to DIY wire your house with ethernet for those of you with a shoddy wireless signal in certain areas of the house. Yay!
via: Instructables
This article is a great one on how to DIY wire your house with ethernet for those of you with a shoddy wireless signal in certain areas of the house. Yay!
via: Instructables
Tuesday, September 1, 2009

Saturday, August 8, 2009
Get Movie Theater Popcorn at Home for Pennies on the Dollar
I love movie popcorn, especially with Rico's nacho cheese sauce. Yum. Great article on how to make movie theatre popcorn from Lifehacker.
http://lifehacker.com/5332568/get-movie-theater-popcorn-at-home-for-pennies-on-the-dollar
http://lifehacker.com/5332568/get-movie-theater-popcorn-at-home-for-pennies-on-the-dollar
Monday, August 3, 2009
Home Theatre Calculator - Viewing distance
Found this great XLS sheet that calculates viewing distance
http://carltonbale.com/home-theater/home-theater-calculator/
http://carltonbale.com/home-theater/home-theater-calculator/
Sunday, June 7, 2009
Connecting to a Passworded Mapped Folder as Another User
So I added my parents harddrive to my server so they'll be able to access their files from anywhere in the house. The problem is I have a harddrive already hooked up (which is already passworded), and I prefer to not have their nosy eyes peeking around. So, in order to not allow them access to my data, but allow them access to their drive, I updated the permissions on my drive and eliminated the password required to connect to shared files. The problem here is I couldn't map the drive with my data to a new computer with the login info required to access the folder.
So, after searching google, I came across this blog post at Bizpassion
Via: Bizpassion
So, after searching google, I came across this blog post at Bizpassion
I use my laptop in different places and they all have different domains. I don’t want to login my computer with different user name for each individual domain, so I just login my local computer. However, when I am trying to connect a share folder that within the domain, it will tell me “Access is denied”. It will not prompt for user name or password, but simply use my current local account info.
There are many ways to around this problem. One way is to create a user name within the domain which has idential user name and password with your local account. I did not try that, and I found that is not feasible most time.
My solution is to use Map Network Drive:
1. Right click-on the folder you want to connect through “My Network Places”, and choose “Map Network Drive…”
2. Click on “Connect using a different user name”
3. The user name should be in something like “ABCCompany\Bob” format (ABCCompany is the domain name, and Bob is the domain user name that has privilege to connect to the folder”, and type corresponding password as well. Now click “OK”.
4. Click “Finish”This sounds simple, but often you will get an error message:
The network folder specified is currently mapped using a different user name and password. To connect using a different user name and password, first disconnect any existing mappings to this network share.and,
Multiple connections to a server or shared resource by the same user, using more than one user name, are not allowed. Disconnect all previous connections to the server or shared resource and try again…
This happens because you earlier trying to connect the computer with your local account info. You must disconnect this connection before you can try to connect with a different account, i.e. a domain user
To do this, go Start -> Run, and type “cmd
now you can disconnect all existing connection, and you can map a Network Drive as I metioned above.” to open a DOS window (sorry, that is how I call it…)
type the command:
net use * /delete
Via: Bizpassion
Saturday, June 6, 2009

Friday, June 5, 2009
Connecting Google voice to Skype
Found this great article on LucaFiligheddu about connecting Google voice to Skype. I'm the type of person who doesn't like to carry his phone around the house with me. Plus, I go through various phones (depending on my mood) which are from different countries (Hong Kong, Japan), so reception varies as well. I have a computer in most of my rooms, plus a laptop I'm always on, so it will be a great way to log and receive my calls where ever I am in the house!
via: LucaFiligheddu
Yesterday, thanks to a magic by Craig Walker, head of Google Voice and former co-founder and CEO of GrandCentral, my GC account has been migrated to Google Voice.
The point is that Google Voice is linked to a US number so I needed to figure out how to make people always reach me regardless of my position since I use my Google Voice number as my primary US number, available on my email signature too.
The solution? Make my Skype on my laptop ring. If you are asking yourself how to do that, I have to tell you that it’s pretty easy. You just need to register to Gizmo5, get a SIP number and tell Google Voice to forward each call to that Gizmo5 account.
When ready, go to your Gizmo5 account and configure it to forward each inbound call to your Skype ID, thanks to one of the latest features added by Gizmo in the past months (OpenSkype). That’s also a great way to get a SkypeIN number without having to pay for it

When in the US instead, I used to configure GrandCentral, now Google Voice, to forward all my calls to my US mobile number. Pretty straightforward, isn’t it?
All that said, now when you call me at my Google Voice number, my Skype will ring, regardless of where I am. And be aware that if you leave a voicemail where you say “test”, I will read a friendly “hello”, thanks to the wonderful transcription by Google.


via: LucaFiligheddu
Saturday, May 30, 2009
Sync'ing your itunes library across the network
I wanted to not only have a central place for my music, but have all the clients (connected computers) display/update metadata like playcount and ratings. Playcount is important to me and WMP doesn't seem to do it, so my next choice is iTunes (since my ipod keeps track of playcount). I found this article on Lifehacker, which allowed me to sync the library with both my windows computers, and my macbook.
via: Lifehacker

Now that you've been going to town adding music and movies to your iTunes library, your hard drive's pretty crowded - and all those space-hogging media files might have a better home on that empty external hard drive you've got set up.
iTunes has a (deservedly) bad reputation for taking total control of your music and videos, including where they live on your computer. It wasn't always easy to move your library in past versions of the software, but happily iTunes 7 makes relocating an existing media library pretty painless - that is, with a little know-how. Here's how to get it done.
WARNING! Before you do this, back up your iTunes library files. This method isn't the official one published by Apple - theirs still keeps iTunes' internal database files in the default location - so make sure you've got a full backup before you begin in order to avert possible iTunes disaster. Thank you.
Change your settings. First, in iTunes' Preferences panel, in the Advanced section, make sure "Copy files to iTunes Music folder when adding to library" is checked, as well as "Keep iTunes Music folder organized." Then, in the "iTunes Music folder location" area, click on the Change... button, and enter the folder on your external drive you want to move your library to.
Hint: Store your music in a subdirectory of the destination. Like, if your new spot is D:\iTunes\Gina\, set your music folder to D:\iTunes\Gina\Library\.

Move your music. Now that you've set the music location to the destination folder, it's time to relocate the actual media files. iTunes can do it for you. From the Advanced menu in iTunes, choose "Consolidate Library." You'll get a prompt that looks like this:

That is exactly what you want, so hit the Consolidate button. Depending on how large your library is, this process may take some time to complete.
Move the internal iTunes files. Now that your music is moved to the new location, you're almost there. While the actual media files themselves are now in the destination, a few other internal iTunes database files and album artwork images have been left behind. This move you must make manually. So, quit iTunes, and browse to your original library location. Select the "Album Artwork" folder, as well as the
iTunes Library.itlandiTunes Library.xmlfiles and copy them to the clipboard. Browse to your new library location and drop 'em in.Hint: here's where that music sub-directory you created comes in handy. If your music lives in D:\iTunes\Gina\Library\, drop these files and folder into D:\iTunes\Gina\.
Point iTunes to the new library database file. Now you've got two copies of your library, one in the source (internal drive) and one in the destination (external drive). To point iTunes to the new location, hold down the Shift key (Option on the Mac) when you launch iTunes. When it asks what library to use, click the "Choose Library..." button and browse to the iTunes Library.itl file on the external drive.
From there, iTunes will use the new library location and you can delete your old library folder and free up all that space on your hard drive it hogged up.
Bonus: It's portable! Using this method, you can plug in your external hard drive to another computer (PC if you've got iTunes on Windows, or another Mac if on the Mac) and as long as it gets assigned the same drive letter, you can access your full library, with play counts, playlists and other metadata intact from anywhere. Booyah!


via: Lifehacker
Sunday, May 24, 2009
Netgear HDXB111 Powerline HD Plus Ethernet Adapter Kit
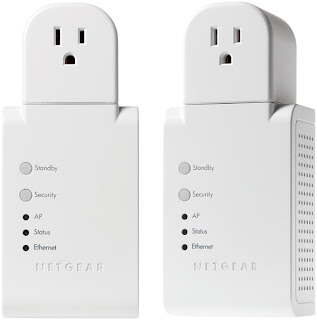
WiFi strength on my bottom floor isn't terribly strong (PS3 shows it between 35-45%), resulting in a choppy picture when I stream movies to my PS3 from my server upstairs (where the router and modem are located). I figured ethernet would be quicker, but drilling holes in the house wasn't an option. So I decided to try out the hdxb111, which uses the house's wiring to transmit the signal.
It comes with software which automatically detects the individual powerline units in range. I had a little trouble connecting the two, because of the security feature, but was able to solve that problem by turning the security off (not recommended by netgear).
Bottom line, the product worked pretty well, however, the signal still wasn't strong enough to stream my dvd rips (7gb a piece) mainly due to my house's old wiring (it was built in 1965). Newer houses should have better results.
Saturday, May 16, 2009
Streaming media from Windows Vista to the PS3
Took me a while to get this to work, but finally I did. This is what I did.
1. Turn on PS3
2. Open Windows Media Player 11 on my PC
3. Click on Library->Media Sharing, which will open the Media Sharing window (see image below)

4. In the window, check the "Share my media" box. Under that you should see "Unknown Device". This should be the playstation. (If you don't see it, reboot the playstation. Sometimes you have to reboot for them to see each other). Click "Unknown Device" and then click the "Allow" button. Click Ok.
**If "Share my Media" is greyed out, click on "Network Settings", and in the Network and Sharing window, next to your network name, click "customize" and check "private network".***
5. Back on the PS3, go to the XMB (XrossMediaBar), go to Music, Video, or Pics, and click "Search for media servers".
6. Once it finds the servers, you should see a windows Icon. (example below)

7. Here, you should be able to see your files.*
*I have found that in order for you to be able to see your media files, you need to put your media into the respective music/videos/picture folders. You can't even put them in sub-folders. Hopefully Sony will do something about this.
***UPDATE***
I just installed this:
Java PS3 Media Server for Windows and Linux | mirror
All I did was turn on the PS3, install it on my PC, and they automatically found each other. I added different drives (including my external drive), and it found everything. I can even play my ripped dvds in the VIDEO_TS folders. Flawless!
via: Dreaming Emotion
Subscribe to:
Comments (Atom)
